|
|
|
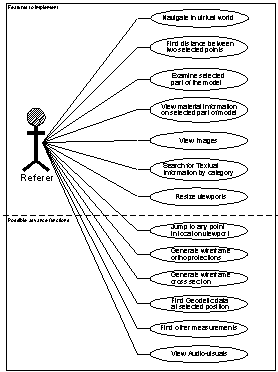
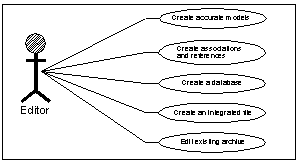
Requirements and Specifications3.1 Fictitious ScenarioFor the purpose of simplifying the design analysis of the proposed project, a fictitious scenario was assumed as follows: An enthusiastic architectural conservationist possesses a valuable archive in the form of measured drawings, photographs, textual data of many heritage structures, which his firm has gathered and prepared over a period of 25 years. More recent measured drawings are in the form of CAD drawings, digital photographs, and electronic documents (consisting the history of the structure and the reconstructions carried out by his firm). The conservationist needs to refer to a lot of details if any restoration or reconstruction has to be carried out on a particular structure. He follows the only method that is available to him for finding the references between the measured drawings, photographs and textual information, and that is by usage of natural language (using alphanumeric characters). He finds it very cumbersome and time consuming to check and cross-refer every detail for planning out his professional itenary. Looking at the major developments in the field of computing and virtual reality, the conservationist decides to investigate the possibilities with a software professional in the graphics field. A discussion with the software professional follows. A list of items required and future possibilities of the project are discussed. The conservationist and the software professional come up with the following ideas for the proposed application: - The primary aim of the application would be to link together all related information of different formats pertaining to a particular heritage structure and to make an application which facilitates referring to this information. - The application would be built in 3 stages. First would be to make a prototype of a referencing tool with very simple functions. Second would be to add advanced functionality to the referencing tool. And finally the third stage would be to create a “creation and editing tool” for creating new archives or modifying existing ones. - The application would have to make extensive use of 3D technologies as a basis for creating references to other data formats. - The application would be user friendly to an extent that even a non-professional could use it for research purposes. This is necessary as Historians or even conservationists may not understand any software complexities. Furthermore, this tool can then be made available to general population or to the tourist industry for commercial exploitation. - The application would require dual or even triple experts (a person knowing the fields of architecture, 3D-modeling and software) for creating or editing the new file format. The conservationist gives the “go ahead” for the first stage of the prototype and asks the software professional to chalk out a business and time plan. 3.2 Mission restated (Top)To provide a referencing tool for “architectural heritage conservationists” and “the general population”, which facilitates easy referencing between existing diverse formats of documents, using new media and virtual reality. The design of the system was split into three parts for convenience: - Features to be implemented in three months for the MSc. individual project. This was considered to be the first stage of proposed project (See figure 3.2 – top half). - Possible advanced features that were needed for a fully functional referencing application that can be used by the conservationists (See figure 3.2 – bottom half). - Features of a further advanced feature, the editing tool, for editing and creating the file format of the data of heritage structures suitable for the referencing application (See figure 3.3).
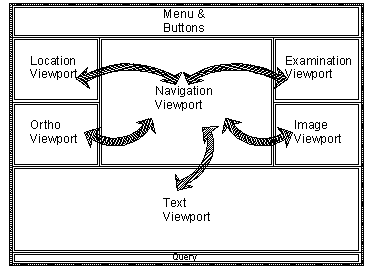
Note: The features are presented using standard Unified Modeling Language notations, the use case diagrams. For each use case, a detailed description is provided to give the specifications of the proposed system. A schematic diagram of the user interface for the referencing tool is shown in figure 3.1 for convenience of explanation. 3.3 Requirements Capture (Top)
3.4 Specifications
(Top)
Use Case Description for the Referencing Tool (Refer to figure 3.2):
Use Case Description
for the Editing Tool (Refer to fig 3.3):
3.5 Selection of structure (Top)The following conditions were considered while deciding the heritage structure for the project:
Four options were considered:
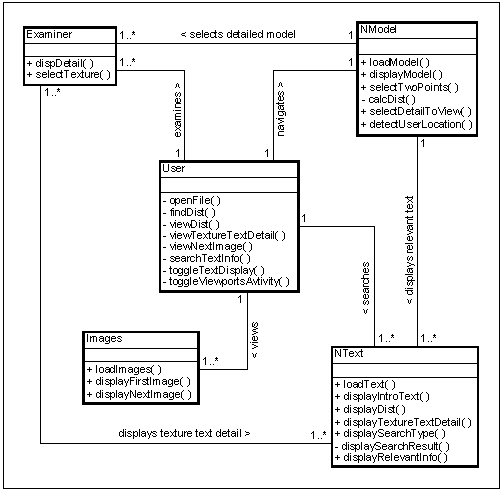
Considering the conditions, “Sheffield Town Hall” was considered as too complex and would consume majority of the time for the construction of the model. Sheffield Cathedral was rejected for the same reason. Wells Cathedral, besides being complex, is located too very far away. Hence “The St. George’s Church – Flats” seemed to be the best option. As the structure belongs to the University of Sheffield, orthographic projections were easily available from the University’s Estate Department (through Mr. James Ingram). Arrangement was yet to be made for acquiring photographs, and textual data. The structure is located within a few minutes walking distance. Hence, immediate site visits could be made easily. The structure is of heritage importance and is of moderate complexity and was considered appropriate for the first stage of the proposed project. 3.6 Design Analysis (Top)The business class diagram gave an initial overall picture of the proposed application. These were changed during the implementation design depending upon the hardware and software capacities and optimization issues. For clarifying the functions of each method in the classes, a description is also provided.
Description for methods openFile() will load the 3d-Model (using loadModel() of NModel class), the text (using loadText() of NText class) and the images (using loadText() of Image class) in the memory. Simultaneously, it will display (a) the model in the navigation viewport with the camera position defaulted to the first camera position (using displayModel() in NModel class), (b) the introductory text about the Heritage structure in the Text viewport (using displayIntroText() in NText class) and (c) the first image in the Images viewport (using displayFirstImage() of Image class). findDist() will allow the user to select two points in the Navigation viewport by using selectTwoPoints(), calculate the distance using calcDist() (both of NModel class) and display the resulting distance in the Text viewport using dispDist() (of NText class). viewDetail() will allow the user to select allowable parts (chunks) of the 3d-model in the navigation viewport by using selectDetailToView() (of NModel class) and display the detailed model in the Examination viewport using dispDetail() (of Examiner class). ViewTextureTextDetail() will allow the user to select faces (one at a time) of the 3d-model in the Examintation viewport by using selectTexture() (of Examiner class) and display the textual description of the selected texture in the Text viewport using dispTextureTextDetail() (of NText class). viewNextImage() will allow the user to view all the available images in a user controlled slide show fashion. displayNextImage() (of Images class) will be responsible for displaying the images in the Image Viewport. searchTextInfo() will allow the user to initiate a simple searching engine. displaySearchTypes() (of NText class) will display the options and displaySearchResult() will display the search result in the Text viewport. toggleTextDisplay() will allow the user to toggle between whether to show or not to show relevant textual information and while navigating. If it is set to “Yes”, relevant textual information will be displayed in the Text viewport using the displayRelevantInfo() (of NText class) depending on the location of the user in the Navigation viewport. The location is determined by detectUserLocation() (of NModel class). Default will be set to “yes”. (A similar feature can be added for display of relevant images in the Images viewport but this is left for future enhancement) toggleViewportsActivity() will toggle between the Examination and Navigation viewport. Due to hardware limitation, it is not feasible for two real time viewports to function smoothly. Hence this method will make sure that only one of the two viewports are active at a time. Note: XML will be used to organize and store the different
formats of related data. Rules and standards (for organization of this data
and the methods of building the 3D-models) will be developed during the
process of implementation. The final organization of data will become the prototype
file format, which can be used with this referencing tool. 3.7 Hardware Requirements (Top)The following hardware would be required for development and testing of the proposed project: - Pentium-III class microprocessor - 128MB RAM - 16MB VRAM - 20 GB Hard disk - SVGA supporting High Colour (16 bit) at 1024 x 768 screen resolution - Other standard input devices (mouse and keyboard) - CD-ROM 36X or above The following hardware would be required for running the first stage of the proposed project after implementation (henceforth referred to as “Target machine” or “Target system”): - Pentium-III class microprocessor - 128MB RAM - 16MB VRAM - 15.3GB Hard disk with 300MB free space - SVGA supporting High Colour (16 bit) at 1024 x 768 screen resolution - Other standard input devices (mouse and keyboard) - CD-ROM 36X or above - Multimedia Kit (only for further stages). 3.8 Software Requirements (Top)The following software would be required for development and testing of the proposed project: - Windows NT 4.0 or 98 or 2000pro. - JAVA Development kit (JDK 1.3.1) with VRML and XML support - Java3D API (SDK 1.2.1) - Virtual Reality Modeling/Markup Language (VRML) - Extended Markup Language (XML) - AutoCAD and 3D Studio MAX - Adobe Photoshop or any other Image editing software - Microsoft Word The following software would be required for running the first stage of the proposed project after implementation on target machine: - Windows 98 or 2000pro. - JAVA Virtual Machine (JVM – JRE 1.3.1) with Java3D support. - Installation files of the first stage of the proposed application. 3.9 Testing and Evaluation (Top)Testing would be carried out in two categories. First would be specification based testing (black box), whereby it would be checked whether the system caters to all the requirements mentioned in the use cases (figure 3.2 top half). And second would be usability testing, whereby the target users (one conservationist/ architect if possible, one student of architecture and a person without related background) were to be introduced to the system and their responses were to be noted. Seven use-cases were proposed for implementation. Out of these, five features (i.e. user navigation, dimension queries, examination of selected part of model, view material information on selected part of model and search for textual information by category) were considered vital to demonstrate the importance of this system. Additionally the user interface was also a key issue. Hence, successful implementation of these features and good responses from the usability test group was decided as the criteria to determine the success of the project. A fair amount of effort was to be put in to implement all seven use-cases. The selected heritage structure has a big database of information in terms of text, modeling and images for accurate representation. Since, the aim of the project was not to demonstrate accuracy of data, partial data from each type that is necessary for demonstrating the above-mentioned features, was decided to be used (as detailed in section 3.5). |
|||||||||||||||||||||||||||||||||||||||||||||||||||